

In this post I will show how simple it is to create a modern reactive application by harmoniously combining the elements listed below.
- PHP 7.2
- Symfony 4.2.4
- Api Platform
- Mercure
- Panther
- Vuejs
The work of this article is inspired by the presentation of Kenvin Dunglas during the Symfony Live in Paris in March 2019.
We’re going to build a books store. The application allows to consult books, each book consists of a title, a description, an author and an isbn. The user can leave a comment on the page of presentation of a book that will be instantly displayed by all users who consult the page.
STEP 1 – Install Symfony and Api Platform
To install Symfony you can follow the instructions of the official documentation.
$ composer create-project symfony/website-skeleton bookstore
Website-skeleton is the skeleton recommended for web projects, which I recommend as a working basis.
We actually don’t need of all the libraries that website-skeleton provides. Personally, for simplicity, since I run the application on Docker I used the 2.4.2 version of ApiPlatform distribution framework.
If you using Symfony Flex you need to install Api Platform via composer
$ composer req api
STEP 2 – Create Entities
Using symfony/website-skeleton you can use maker bundle to quickly build entities and controllers.
If you have not installed it, run
$ composer require symfony/maker-bundle --dev
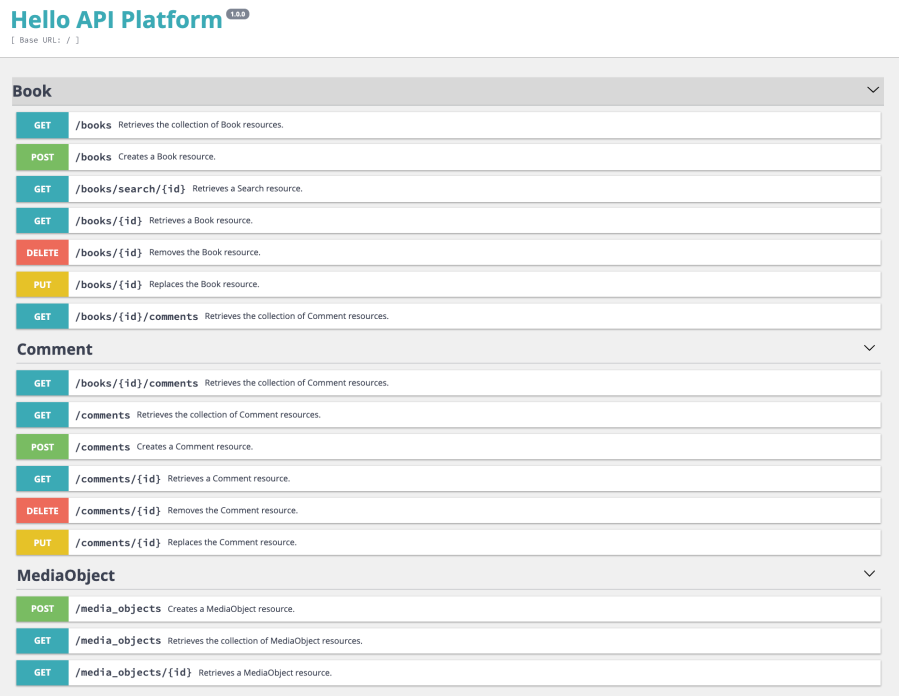
Let’s create threes entities: Book, Comment, and MediaObject and we define them as ApiResource:
/**
* @ApiResource()
* ...
*/
class Book
{
   ...
   /**
    * @ApiSubresource()
    *
    * @ORM\OneToMany(targetEntity="App\Entity\Comment", mappedBy="book")
    */
    private $comments;
    ...
}
The Comment entity is also defined as the Subresource of Book. In this way you can retrieve the comments of a given Book, at endpoint:
GET /books/{id}/comments
/**
* @ApiResource()
*
...
*/
class Comment
{
    ...
}
/**
* @ApiResource()
*
...
*/
class MediaObject
{
    ...
}
If you are using flex, the documentation of your API is exposed with the prefix /api. So to view the swagger documentation you need to open http://localhost: 8000/api. If, like me, you use Api Platform Framework, the url is https://localhost: 8443
For image management, I followed the Api Platform documentation. In this way you can easy linking an image to a resource.
STEP 3 – Fixtures
Install hautelook/alice-bundle:
$ composer require --dev hautelook/alice-bundle
Create a fixture file book.yaml into fixtures directory
#src/fixtures/book.yaml
App\Entity\MediaObject:
    madia_object_1:
        filePath: 'cover1.jpg'
    madia_object_2:
        filePath: 'cover2.png'
    madia_object_3:
        filePath: 'cover3.png'
    madia_object_4:
        filePath: 'cover4.png'
    madia_object_5:
        filePath: 'cover5.png'
    madia_object_6:
        filePath: 'cover6.png'
    madia_object_7:
        filePath: 'cover7.png'
    madia_object_8:
        filePath: 'cover8.png'
    madia_object_9:
        filePath: 'cover9.png'
    madia_object_10:
        filePath: 'cover10.png'

App\Entity\Book:
    book_{1..10}:
        title: <sentence(4, true)>
        description: <text()>
        author: <name()>
        isbn: <isbn13()>
        stock: <numberBetween(1, 100)>
        price: <randomFloat(2, 2, 20)>
        image: '@madia_object_*'

App\Entity\Comment:
    comment_{1..20}:
        name: <name()>
        text: <text()>
        createdAt: <DateTime('now')>
        book: '@book*'
Now let’s create the database:
$ bin/console doctrine:schema:drop --force --no-interaction
$ bin/console doctrine:schema:create --no-interaction
And load your fixtures with the follow command
$ bin/console hautelook:fixtures:load --no-interaction --purge-with-truncate -vvv
STEP 4 – Mercure
If you are using the API Platform distribution you don’t need install Mercure because is already installed and configured by default at port 1337. In this case you have the Mercure debugging tool at http://localhost:1337/.
If you using flex, the official documentation is very clear.
In order to install Mercure you must:
A) Install Mercure
$ composer require mercure
$ JWT_KEY='aVerySecretKey' ADDR='localhost:3000' ALLOW_ANONYMOUS=1 CORS_ALLOWED_ORIGINS=* ./mercure
The port used in this case is the 3000, but obviously you can change it if you want.
B) Setting up the env vars
- MERCURE_PUBLISH_URL=http://localhost:<yourport>
- MERCURE_JWT_SECRET= “A JWT token generated, on jwt.io”
The JWT must be signed with the same secret key than the one used by the Hub to verify the JWT (aVerySecretKey in the example). Its payload must contain at least the following structure to be allowed to publish
{
    "mercure": {
        "publish": []
    }
}
Now that you’re ready to use Mercure, you must add the “Mercure” option to the Book ApiResource entity:
/**
 * @ApiResource(mercure=true)
 * ...
 */
class Book
{
    ...
}
In this way API Platform will dispatch the updates to the Mercure hub every time a Book is created, updated or deleted.
And subscribing to the updates in Javascript is straightforward:
const u = new URL('http://localhost:1337/hub');
u.searchParams.append('topic', 'https://localhost:8443/books/' + this.bookId + '/comments');

const es = new EventSource(u);
es.onmessage = e => {
    console.log('data: ');
    console.log(JSON.parse(e.data));
}
We will see later how to integrate this code into a Vuejs application.
STEP 5 – Install Webpack Encore
In this section we will see how to install Webpack Encore to correctly use the assets files.
Before starting make sure you have nodeJS on your computer.
Then add some libraries:
$ composer require annotations twig encore asset
And install vuejs:
$ npm install --dev vue vue-loader vue-template-compiler
In order to initialize the project run:
$ npm install
These commands will create the assets, node_module, and webpack.config.js files.
If you want, alternately, you can use yarn:
$ npm install yarn
$ ./node_modules/.bin/yarn install
$ ./node_modules/.bin/yarn add vue vue-loader vue-template-compiler
Now we can modify file webpack.config.js and load all javascript and css files.
My configuration file looks like this:
Encore

    .setOutputPath('public/build/')

    .setPublicPath('/build')

    .cleanupOutputBeforeBuild()

    .enableSourceMaps(!Encore.isProduction())

    .enableVersioning(Encore.isProduction())

    .addEntry('app', './assets/js/app.js')

    .enableVueLoader()

;

module.exports = Encore.getWebpackConfig();
You can watching assets running command:
$ ./node_modules/.bin/yarn encore dev --watch
or if you don’t using yarn
$ ./node_modules/.bin/encore dev-server --hot
For this PoC i want use Bootstrap and Sass, so i run follow command in order to install them:
$ ./node_modules/.bin/yarn add sass-loader node-sass --dev
$ ./node_modules/.bin/yarn add bootstrap --dev
And i update my webpack.config.js with adding line
.enableSassLoader()
You can use bootstrap css by importing it in your file scss
@import "~bootstrap/scss/bootstrap";
STEP 6 – Vuejs Application – Hello World
Now we are ready to write applications in Vuejs. Let’s start with a very simple “Hello World” application.
We need to create a Book controller, a book.html.twig template, a welcome.js file and a component Hello.vue.
A) The Controller
<?php declare(strict_types=1);

namespace App\Controller\Book;

use App\Repository\BookRepository;
use Symfony\Bundle\FrameworkBundle\Controller\AbstractController;
use Symfony\Component\Routing\Annotation\Route;

/**
 * @Route("/book/{id}", name="book", requirements={"id"="\d+"})
 */
final class Book extends AbstractController
{
    public function __invoke(
        BookRepository $bookRepository,
        string $id
    ) {
        $book = $bookRepository->find($id);

        return $this->render(
            'book/book.html.twig',
            ['book' => $book]
        );
    }
}
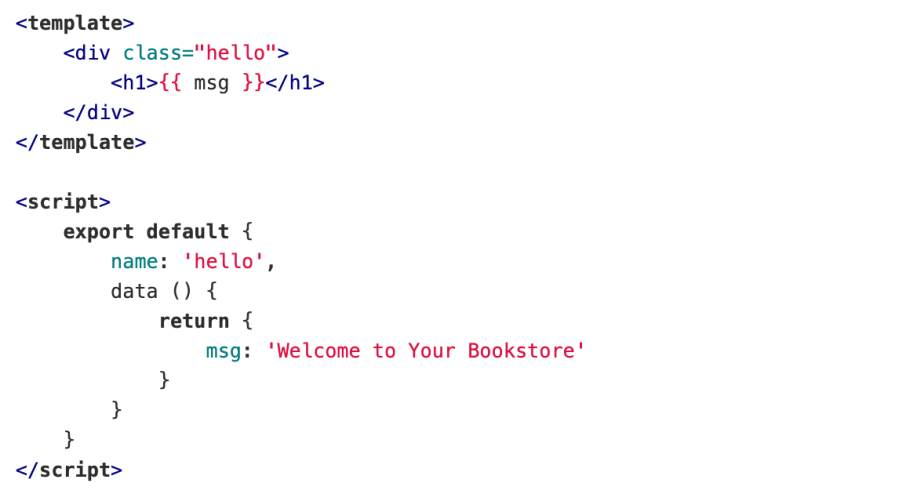
B) The Vuejs component: Hello.vue
C) The js file: welcome.js
import Vue from 'vue'
import Hello from './components/Hello'

// eslint-disable-next-line no-new
new Vue({
  el: '#welcome',
  template: '',
  components: { Hello }
})
D) Update the webpack.conf.js with:
.addEntry('welcome', './assets/js/welcome.js')
E) Load the js file somewhere in your view
{{ encore_entry_script_tags('build/welcome.js') }}
You should have something like this:
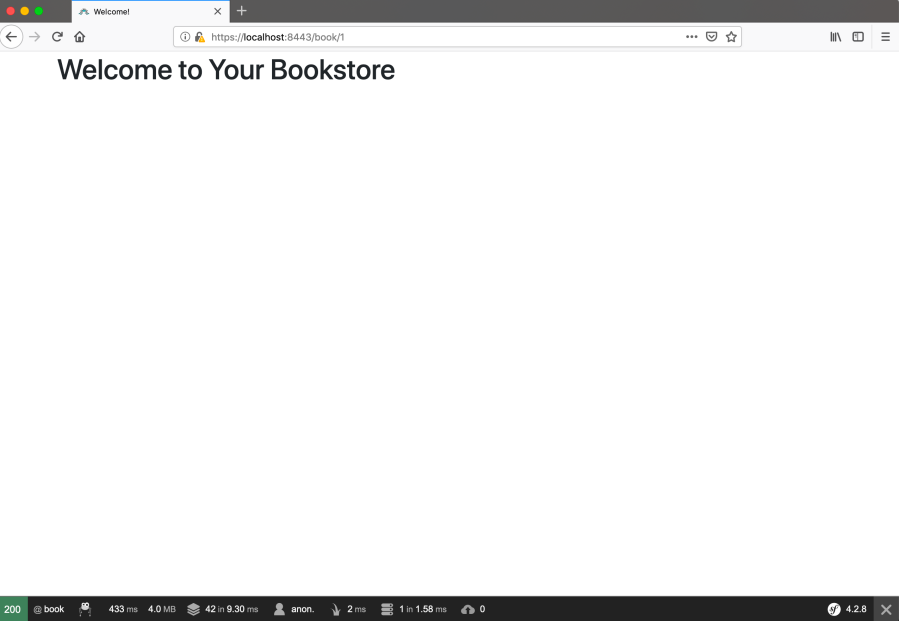
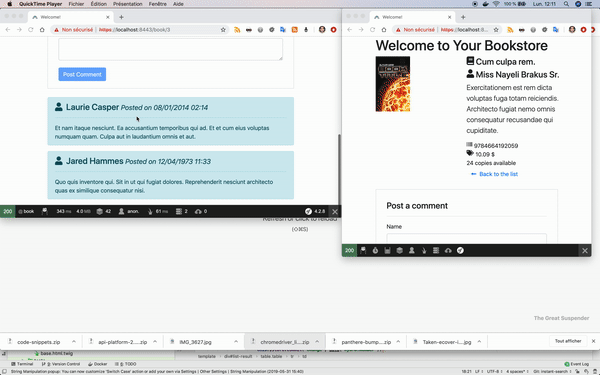
Where the title “Welcome to Your Bookstore” is displayed using the Hello.vue component.
STEP 7 – Vuejs Application – Real time update of available copies of a book
We ran the first Vuejs application in our Symfony project, now we can have a little more fun and write a more complex application.
The goal of this application is to dynamically update the number of available copies displayed on the page.
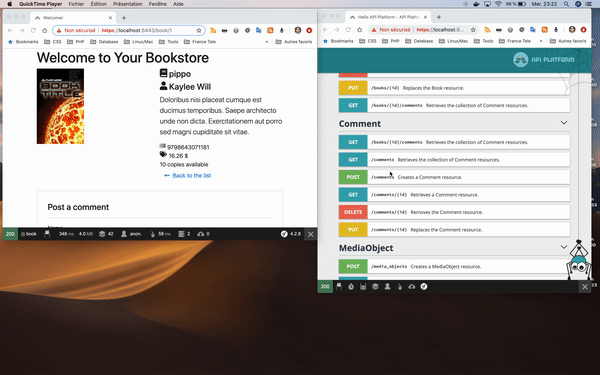
Here’s how a book page looks:
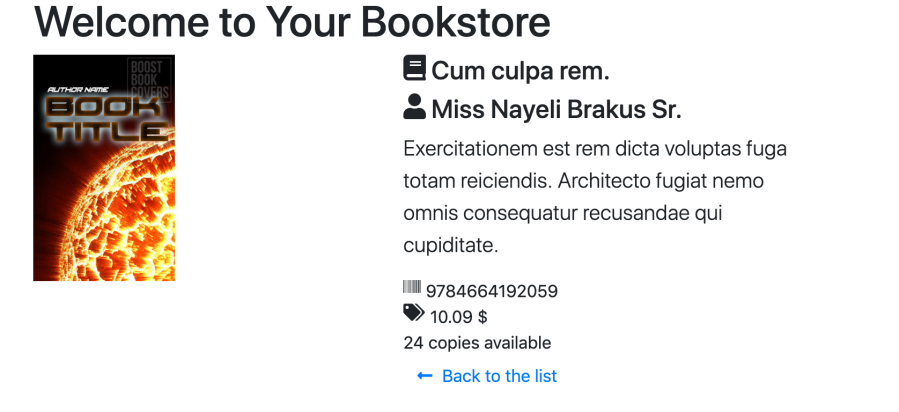
When the number of available copies change, the field into template will be updated in real time, without reloading page.
A) First we create the component Stock.vue, It has the responsibility to listen to any changes in the data of the resource and if the stock field changes value, it displays it on the page.
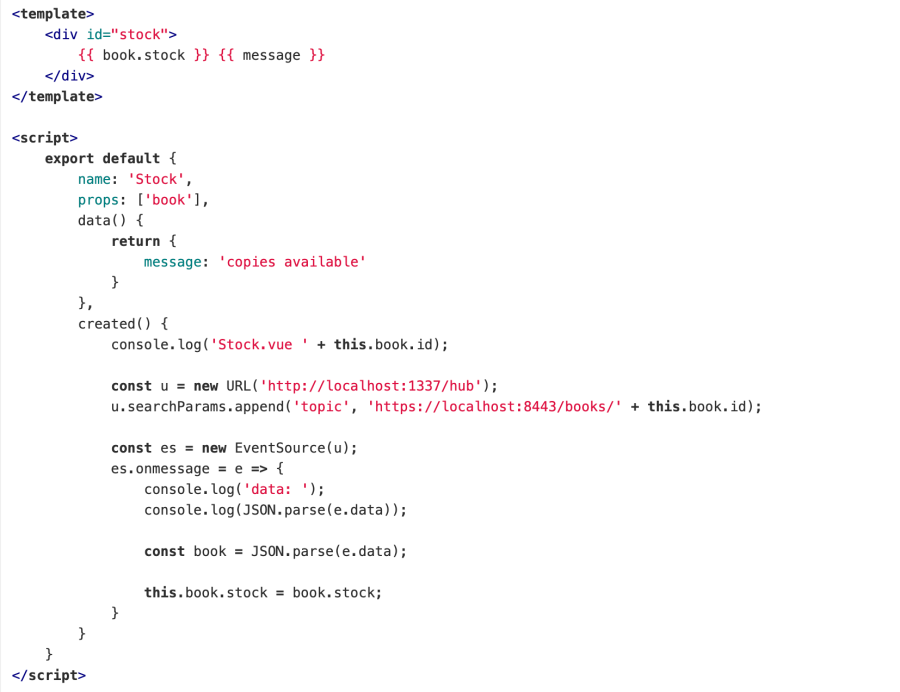
Note that when the component is created the application subscribes to resource updates.
Of course it is not a good practice to put the url statically in the code. For example, you can use the response header to retrieve the correct url, something like this:
methods: {
    getBook() {
        fetch('/books/' + this.book.id)
            .then(response => response.json())
            .then(data => {
                this.hubUrl = response.headers.get('Link').match(/<([^>]+)>;\s+rel="[^"]*mercure[^"]*"/)[1];
            })
    }
}
B) The js file stock.js that instantiate the vue object:
import Vue from 'vue'
import Stock from './components/Stock'

var stockVm = new Vue({
  el: '#stock',
  data: {
    book: {
      stock: 0,
      id: 0
    }
  },
  template: '<Stock v-bind:book="book"/>',
  components: { Stock },
  beforeMount: function () {
    this.book.stock = this.$el.attributes['data-book-stock'].value
    this.book.id = this.$el.attributes['data-book-id'].value
  }
})
Note that i pass a book object to the component via v-bind directive, the object is built into beforeMount. In this method we read the attributes of the #stock element of the template twig.
C) Updating template:

D) Update webpack.config.js
.addEntry('stock', './assets/js/stock.js')
E) Load the javascript file in your view
{{ encore_entry_script_tags(‘build/stock.js’) }}
The Result
STEP 8 – VueJS Application – Real time update of comments
The goal is to have a real-time update of comments left on a given book.
In this time i will not use the “mercure” option of ApiResource annotation of Api Platform. This is because I would like to show you how to use the Mercure component of Symfony natively.
The first step is create a new Action. Its role is to publish the update of a topic.
<?php declare(strict_types=1);

namespace App\Controller\Api;

use Symfony\Bundle\FrameworkBundle\Controller\AbstractController;
use Symfony\Component\HttpFoundation\Response;
use Symfony\Component\Mercure\Publisher;
use Symfony\Component\Mercure\Update;
use Symfony\Component\Routing\Annotation\Route;

/**
 * @Route("/book/{id}/publish/comment", name="new-comment-publisher", requirements={"id"="\d+"})
 */
final class NewCommentPublisherController extends AbstractController
{
    public function __invoke(
        Publisher $publisher,
        int $id
    ): Response {
        $update = new Update(
            sprintf('https://localhost:8443/books/%s/comments', $id),
            json_encode(['listComment' => 'updated'])
        );

        // The Publisher service is an invokable object
        $publisher($update);

        return new Response('new comment published');
    }
}
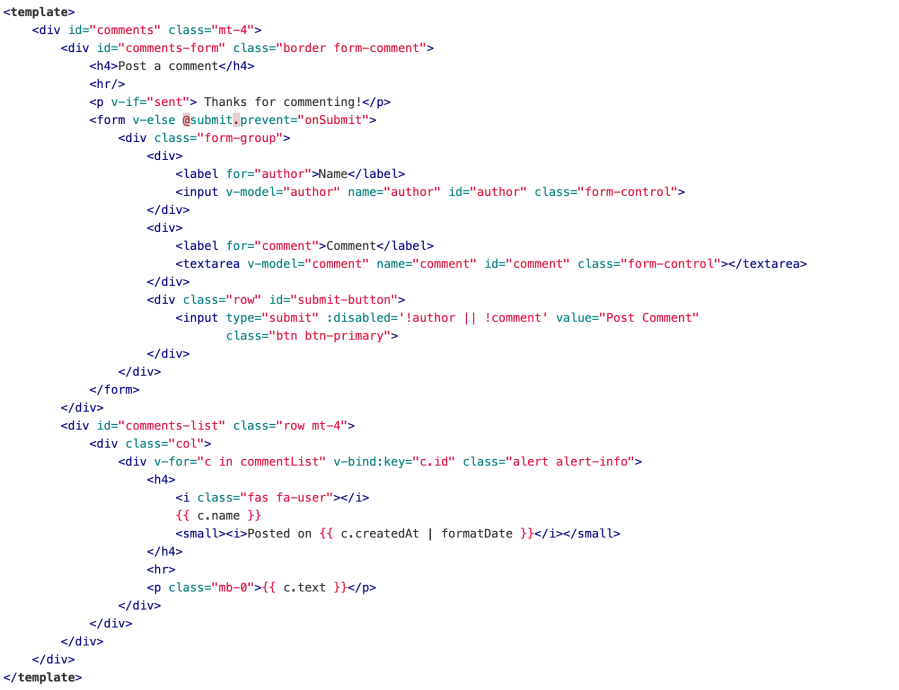
So, now need create the Vue component named Comments.Vue. This component will be responsible to managing the form and to displaying comments:
The template:
And the script
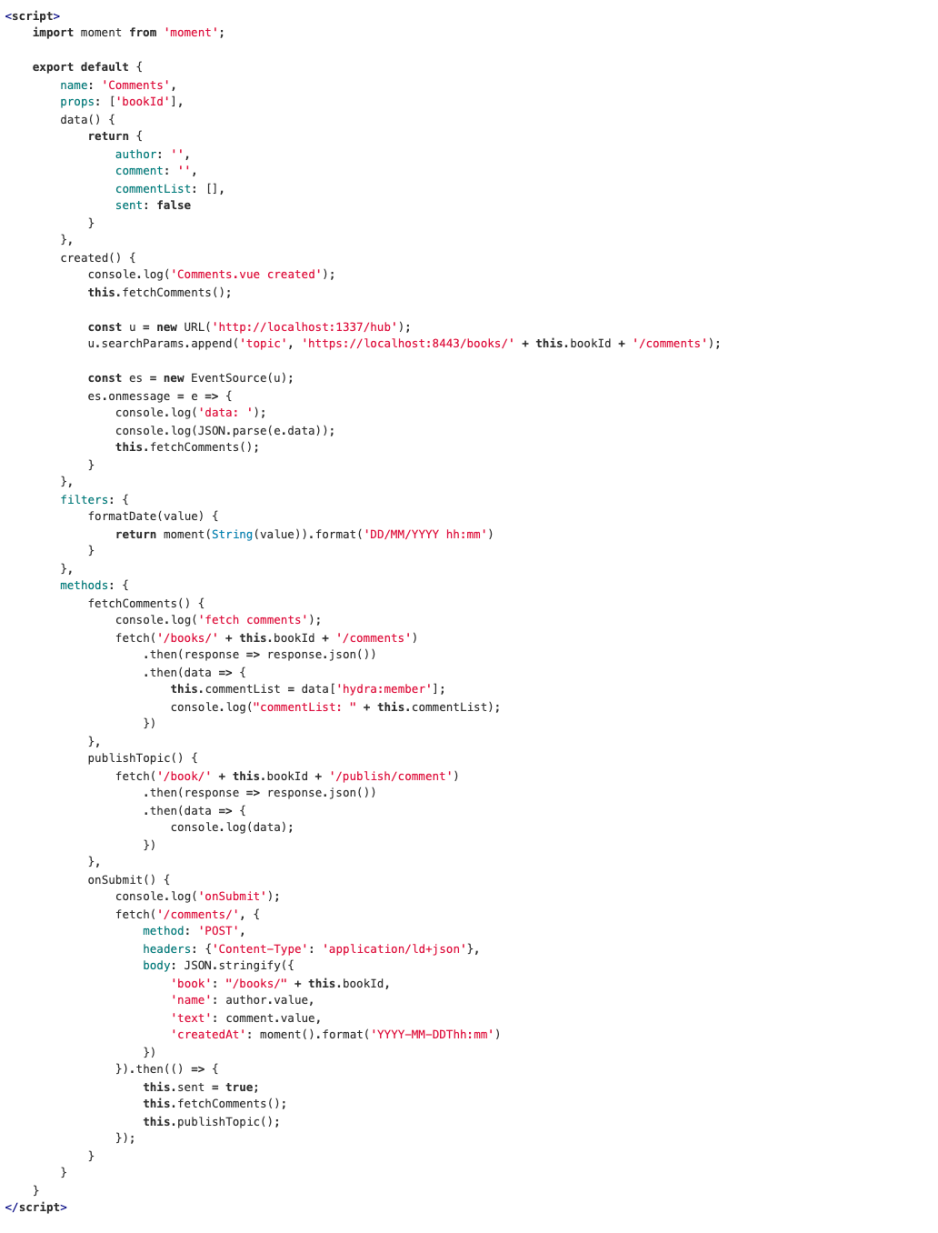
Note that, at creation of component, we subscribe to updates of the same topic defined in the controller seen before. Every time that the form is submitted, the publishTopic method is called. This method simply calls the NewCommentPublisherController action which, as seen before, will publishes the topic update.
We must update the template into templates/book/book.html.twig adding the element:
![]()
And adding the script:
{{ encore_entry_script_tags(‘build/comments.js’) }}
Don’t forgot to update also the webpack.config.js file adding:
.addEntry('comments', './assets/js/comments.js')
The Result
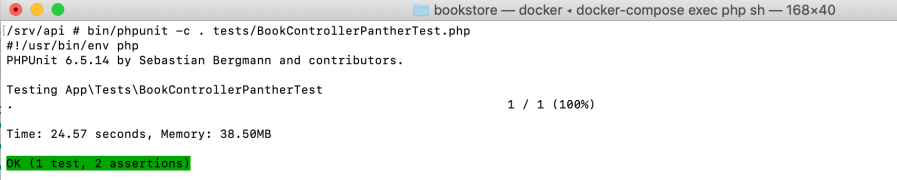
STEP 7 – Testing with Panther
Install test component
$ composer req --dev tests
Here are two different approaches for testing application:
Using Panther Client
<?php

namespace App\Tests;

use Symfony\Component\Panther\PantherTestCase;

class BookControllerPantherTest extends PantherTestCase
{
    /**
     * Test with internal php server and panther client
     */
    public function testBookWithPanther(): void
    {
        $client = static::createPantherClient();

        $crawler = $client->request('GET', '/book/1');

        $this->assertContains('Welcome to Your Bookstore', $crawler->filter('h1')->text());
        $this->assertEquals(1, $crawler->filter('#comments-list')->count());
    }
}
And using Chrome Client:
<?php

namespace App\Tests;

use PHPUnit\Framework\TestCase;
use Symfony\Component\Panther\Client;

class BookControllerPantherWithChromeClientTest extends TestCase
{
    /**
     * Test directly with chrome driver without booting php server and calling the api docker container directly
     */
    public function testBookWithChromeClientPanther(): void
    {
        $client = Client::createChromeClient(null, null, [], 'http://api');
        $crawler = $client->request('GET', '/book/1');

        $this->assertContains('Welcome to Your Bookstore', $crawler->filter('h1')->text());
        $this->assertEquals(1, $crawler->filter('#comments-list')->count());
    }
}

CONCLUSIONS
In my opinion, today a modern web application must have, inter alia, a reactive frontend, a solid and flexible backend for frontend and excellent test coverage.
VueJs, Symfony and Api Platform make this very simple and Panther is extremely powerful and contains all the features you need to test your applications.
Vuejs passed React in popularity, has a short and sweet learning curve, it’s funny and easy to get up and running. When you start using it you can’t stop!!
Symfony does not need any presentation, it is simply the most solid, flexible and powerful framework php that exists today.
Kevin Dunglas and his team Les-Tilleuls.coop, did an amazing job with Api Platform. It becomes so easy to create and fully customize Hypermedia APIs. In the context of API-first projects it’s very easy to expose, order and filter data in a structured way, to document the schema with Swagger so that it can be consumed by any web client. Furthermore, by integrating features such as Mercure or as a Messenger it is easy to communicate with the client or implement the CQRS pattern.
A special thanks to Oumar Konate, my colleague at France Television, and to Pierre Escobar my former colleague at L’Express, that helped me finish this post.
The sample code used in this PoC is freely available on GitHub.
REFERENCES
SASS/BOOTSTRAP
- https://symfony.com/doc/current/frontend/encore/css-preprocessors.html
- https://symfony.com/doc/current/frontend/encore/simple-example.html
- https://symfony.com/doc/current/frontend/encore/bootstrap.html
- https://symfonycasts.com/screencast/webpack-encore-legacy/sass-sourcemaps
MERCURE
- https://dunglas.fr/2019/03/symfonylive-paris-slides-symfony-on-steroids%E2%80%A8-vue-js-mercure-panther/
- https://symfony.com/doc/current/mercure.html
- https://github.com/dunglas/mercure
VUEJS
- https://vuejs.org
- https://blog.dev-web.io/2018/01/11/symfony-4-utiliser-vue-js/
- https://blog.elao.com/fr/dev/comment-integrer-vue-js-application-symfony/
JAVASCRIPT
TESTS

HELLO I find an error during installation on step 2 ($ make vendor):
– “WARNING: The CONTAINER_REGISTRY_BASE variable is not set. Defaulting to a blank string.
– ERROR: No container found for php_1”
Please can you fix this
LikeLike
Normally you must put this line into .env:
CONTAINER_REGISTRY_BASE=quay.io/api-platform
But if you still have problem you can use the Api Platform distribution et paste the copy into src.
LikeLike
[…] from the Bookstore application that we created during the previous PoC, now we want to add a user account, which allows to authenticated user to view and change personals […]
LikeLike
[…] We’re going to build a books store. The application allows us to consult a books list. You can filter on title or author and you can add a book into shopping cart. It is roughly the same type of application made in my first post of these series. […]
LikeLike
NotFoundHttpException is the error i get once i try to display my front 😦
LikeLike